Hello everyone. Today is that one day of the week when the sun is
SHINING! My spirits are up and am hopeful that summer is just around the bend. AND I am really
EXCITED to share with you my new sewing room cutting table.
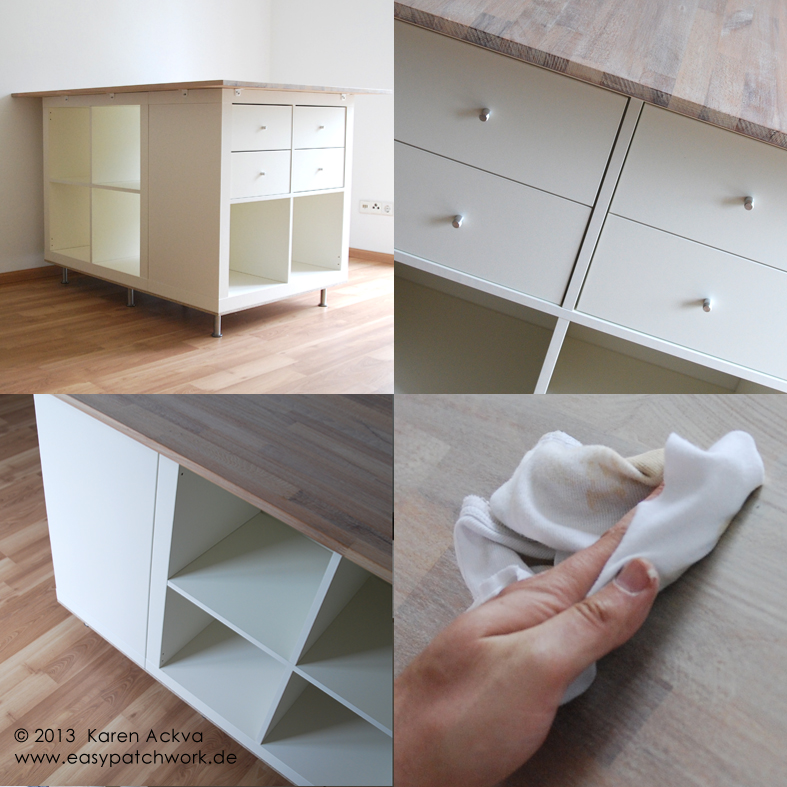
The table measures roughly 100 x 140 cm and is 92 cm high.
As some of you may have gotten or known, we bought a house and moved to Bavaria this year, and with it a new sewing room. Before, I always did my sewing at the kitchen table. We didn't have a formal dining area, so this multi-purpose room (sewing, breakfast/lunch/dinner, homework, crafting) got a little crowded at times. I really enjoyed sewing there on our dining table which was light birch wood.
Wow, a whole room for my sewing (and crafting). How much better can life get? I had a clean slate to design my area. I thought and designed and thought and designed. I am so happy I allowed myself time to think about it.
When we first moved in, everything got cluttered up in there - all of my fabric, hallway tables, two desks, crafts, bulletin boards, chairs, etc., etc. A couple of months later, I started to take the matter at hand and start to purge and organize (after most of the other fires in the house were tamed like light fixtures and kids' rooms). My husband was kind enough to offer me his office table which is 180 x 60 cm. This is really a great table and matches another smaller table of 120 x 60 cm (both from Ikea) which I wanted to use for my sewing. Of course, it is great to have such a LARGE table for basting and laying out patterns, and I was really thankful that my husband offered it to me, BUT I thought it took up too much space in my room to serve just one purpose of a table.
I wanted storage room under the table. Do you know what I am talking about? I read blogs and looked for solutions and found that other sewers also had the same "beef". I need it simple-easy-practical (and multi-purpose).
Most of the ideas I found involved Expedit shelving from Ikea. (I love Swedish design and not just from Ikea.) I found a really nice cutting table using 2 (2 x 4) Expedit shelves and a butcher blog top on wheels. Probably most of you have seen this? I wanted my cutting table smaller so I can also put in a couple of book shelves for storing books and fabrics, so I found another version at
Ikea Hackers for an awesome cutting table using 3 (2 x 2) Expedit shelves. I wanted to have legs on mine so I could sweep under the table when needed. (I hope I don't need wheels or casters in the future.)
My husband was really wonderful and did most of the work for me!! Thank you, Schatz!
Here is the material list:
| QTY | Description |
| Price |
|
|
|
|
|
|
|
| 3 | 2 x 2 Expedit shelves or similar |
| 66€ |
|
|
|
|
|
|
|
| 8 | Capita 11 cm legs | | 20€ |
|
|
|
|
|
|
|
| 1 | 118 x 79 cm Pressed Board? "Spannplatte" |
| 10€ |
|
|
|
|
|
|
|
| 10 | Small L-Brackets |
| 15€ |
|
|
|
|
|
|
|
| 1 | 100 x 140 cm Butcher Block Counter Top (beech wood unfinished) 18 mm thick |
| 60€ |
|
|
|
|
|
|
|
| 50? | Wood Screws |
|
|
|
|
|
|
|
|
|
| 1 | Can of Birch Color Wax-Stain |
| 12€ |
|
|
|
|
|
|
|
| 1 | Strong and Willing Partner to do the dirty work |
|
|
|
|
|
|
|
|
|
| Various Grains of Sand Paper |
|
|
|
|
|
|
|
|
|
| 2 | Optional Drawer Set of 2 for Expedit |
| 30€ |
|
|
|
|
|
|
|
| Rough Expenses |
| 200€ |
|
|
|
|
|
|
|
We started by putting the shelves together per Ikea instructions. (My husband has become THE Ikea furniture builder the last couple of months.) After I sanded the edges of the pressed board, we then set it on top and screwed them in place. There will be a
one centimeter gap between the shelves that butt up back to back. That is one reason why the additional board is needed. Then attach the legs. We were very calculated when lining up and measuring the distance of the legs. I am a quilter and have all of the necessary tools. ;-) Please refer to diagram for a better idea of where to put the wood screws; remember, there is a gap between the shelves. (We first attached only six legs and found that it needed more stability in the middle. Seven legs give a good design and added stability.) Here is a good stopping point.

After we got the butcher block from the home improvement store - we had to order and wait on the wood, my husband put a wax a stain on the counter. I didn't want a dark stain and was pleased with the natural look but KNOW that I will have a cup of coffee on the top and with it a stain. A clear lack coat would not work for me, because I didn't want the red beech wood to show through. So, we needed a water-resistant coating. We choose a birch coating just to knock of the look of redness of the beech wood. One coating is enough. Let it dry for a couple of days. Sand with fine sand paper.
Oh, my hubby only stained the top and sides per my request. If your counter top is not super flat, you will want to stain the side that is bowed up like a boat. When the board is screwed down to the base, it will level out better.

Then we put the counter top on the floor right side down and the base on top. We centered the base, pre-drilled wholes for the wood screws and screwed the L-Brackets to three adjacent sides of the counter top. The base was flipped back over and counter top was slid over one end. Then the counter top was screwed to the last side and then to the base. We carefully flipped the table back over one last time and voila!
I was so excited to see my table finally set up....I took some snapshots and ran to the basement for my quilting books and magazines. (Check) Two more boxes sorted and emptied. Twenty to go.
If you build this cutting and crafting table, leave me a comment so I can check it out.
I look forward to sharing more ideas from my sewing room in the future. Stay tuned and keep sewing and crafting.
Yours truly,
Karen
Update: Some things I forgot to mention in the post yesterday.
If you don't want to spend the money for a butcher block counter top, just buy a second piece of pressed or chip board the same size as the base. Invest the money into large cutting mats and your cutting surface is finished. I personally like the look and feel of wood, so this was a better option for me.
Also, there is a gap between the cutting table and the wall! I thought about this before we made the table. We could have extended the cutting top on three sides and left the base flush with the wall, but then my options of moving it around in the room would have been limited. Now, I have a little extra space at the end of the table (where the wall is) where I can put my large cutting mat or rather my travel bag with cutting mat and rulers.
If you don't want to put legs on the base, you could also attach spacers at the top and raise the counter top up so the table is at a good height for cutting. Ninety centimeters is a good height for a 5'5" quilter. Then, you could put your mat and rulers between the base and the counter top. I would still recommend connecting all three shelves at the bottom and top though.
Oh, also, these shelves and drawers come in a variety of colors now from pink to turquoise. Go wild!

 Oh, my how flies by. I just checked out my own blog to realize that I have only ONE post in the Month of June. What was going on this month?? We had two birthdays and a house warming party! I had one weekend to enjoy the solitude of great weather and no interruptions where I could concentrate solely on my sewing hobby. How much better can life be?